Overview
Stop fighting with firewalls and NAT. Access your RTSP streams from anywhere with reliable cloud endpoints. TheRelay uses a small on-prem agent to publish your camera feeds to the cloud so you can view or integrate them via standard protocols without opening inbound ports or changing firewalls.
Key Idea
A single outbound, encrypted connection from your LAN to TheRelay Cloud—no VPNs, port forwarding, or firewall edits.
Highlights
- Publish once from the LAN; consume anywhere.
- Standard protocols: WebRTC, RTSP, SRT, HLS, RTMP.
- Camera credentials remain on-prem with the Agent.
- Fine-grained, token-based access control (camera or host scope).
Getting Started
- Create your TheRelay account and organization.
- Install TheRelay Agent on your local network.
- Add your local cameras.
- Create an Access Token.
- Enter the Access Token in the dashboard.
- Use the required protocols as needed: WebRTC, RTSP, SRT, HLS, RTMP.
TheRelay Agent
TheRelay Agent is a tiny service you run on a machine inside the same LAN as your cameras. It reads RTSP directly from the cameras and opens a single outbound, encrypted connection to TheRelay cloud, so no inbound ports, VPNs, or firewall changes.
On the Publish page you'll see the exact command to run for the selected operating system:
Windows Installation
- Run the command in PowerShell.
Linux Installation
- Run the command in your Terminal.
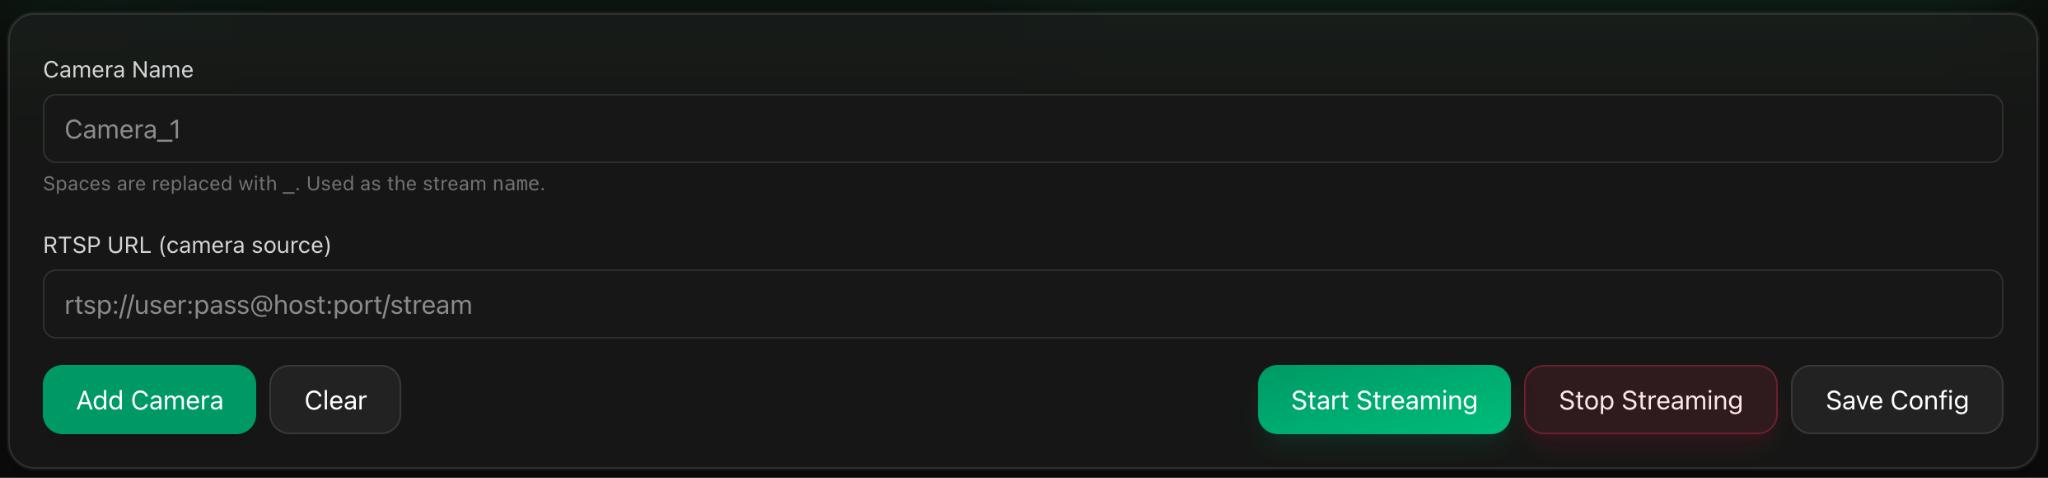
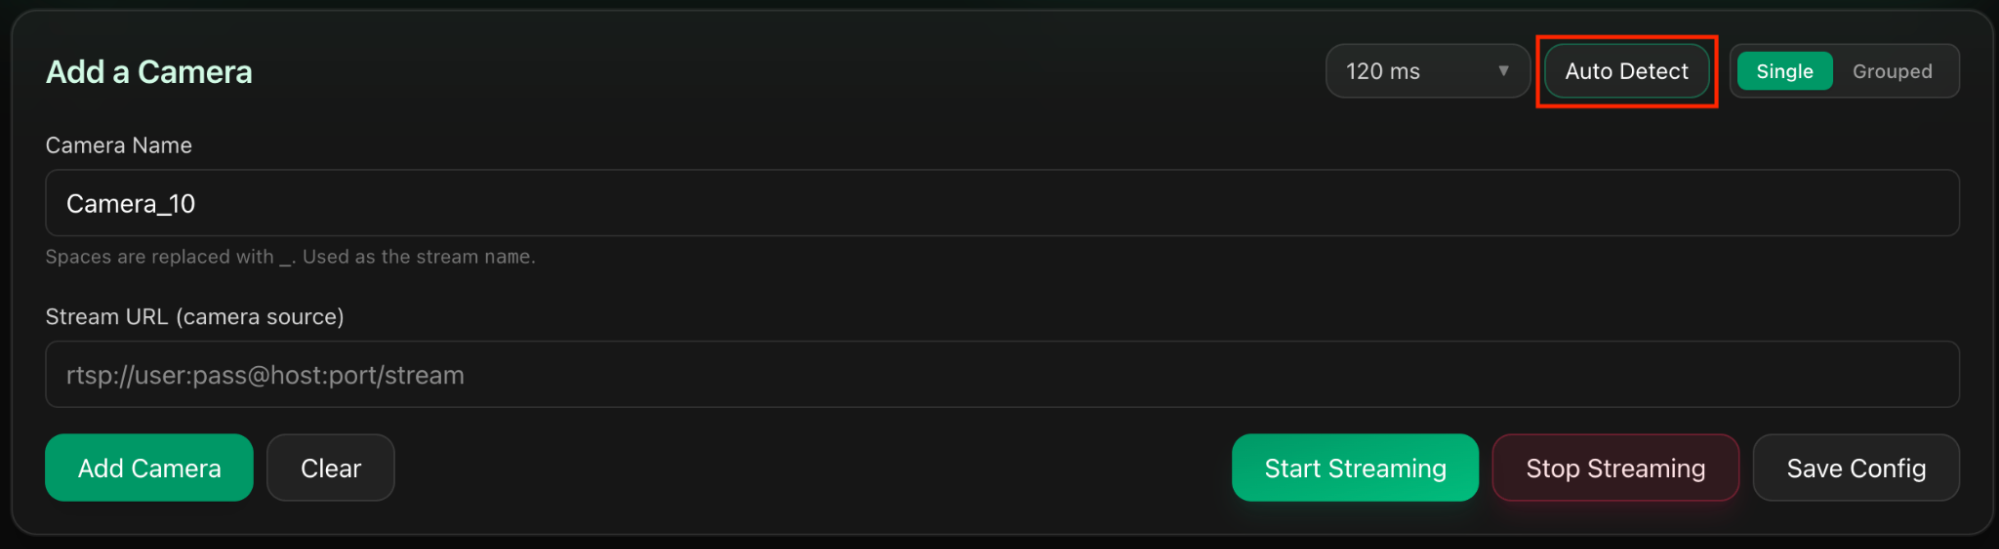
Adding a Camera
- Add a camera name.
- Enter your localhost camera RTSP URL
- Click Add Camera to add it to the list.
- Press Start Streaming to start the streaming process
RTSP URL Examples
Hikvision:
rtsp://USER:PASS@CAMERA_IP:554/Streaming/Channels/101

Dahua:
rtsp://USER:PASS@CAMERA_IP:554/cam/realmonitor?channel=1&subtype=0

Axis:
rtsp://USER:PASS@CAMERA_IP:554/axis-media/media.amp

Generic:
rtsp://USER:PASS@CAMERA_IP:PORT/PATH
Replace USER, PASS,
CAMERA_IP, PORT, and
PATH with your camera's details.
Credentials Stay Local
Camera usernames and passwords remain on the LAN; they are stored by the Agent and not transmitted to or stored in the cloud.
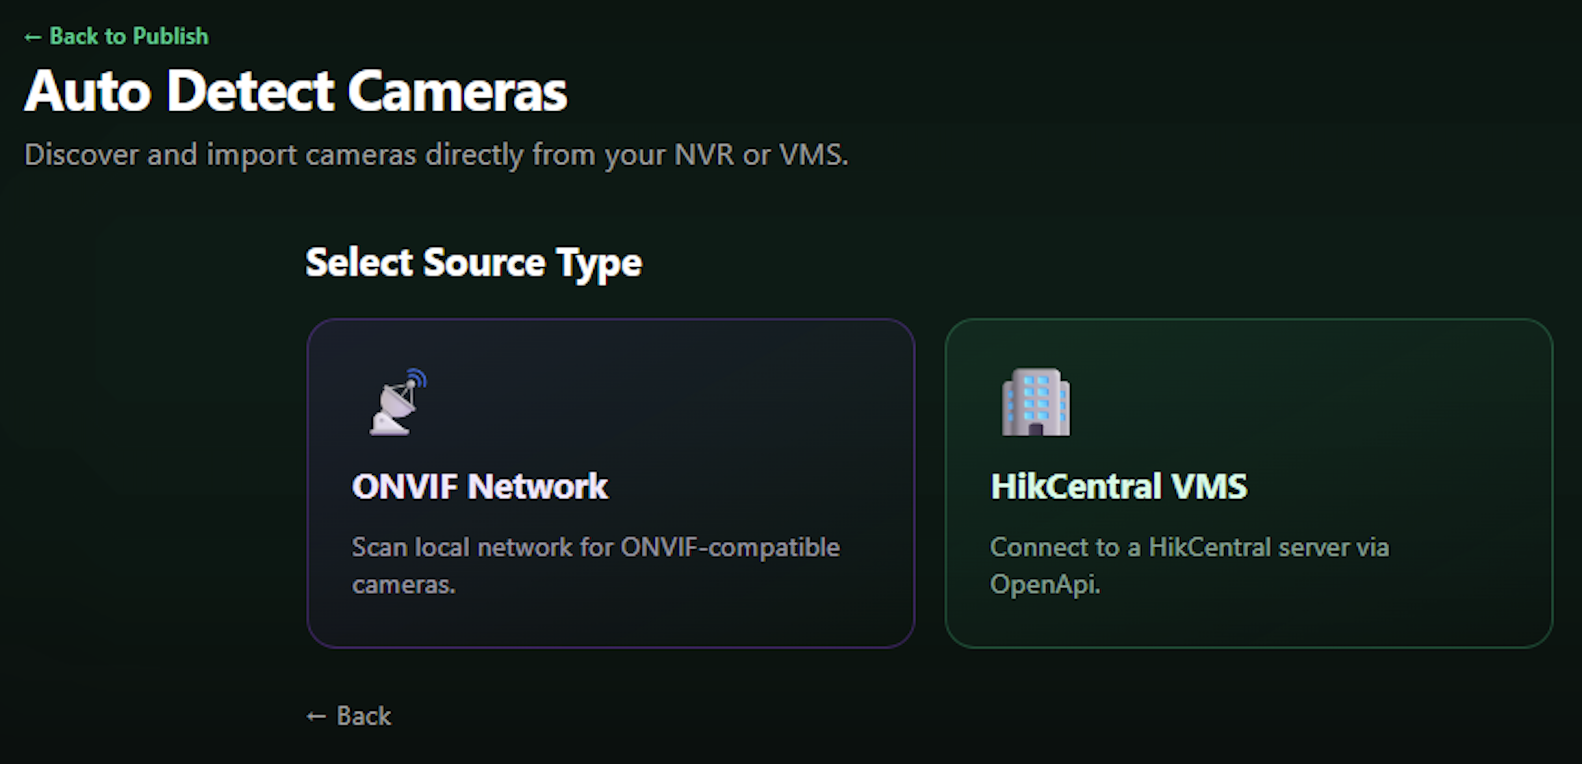
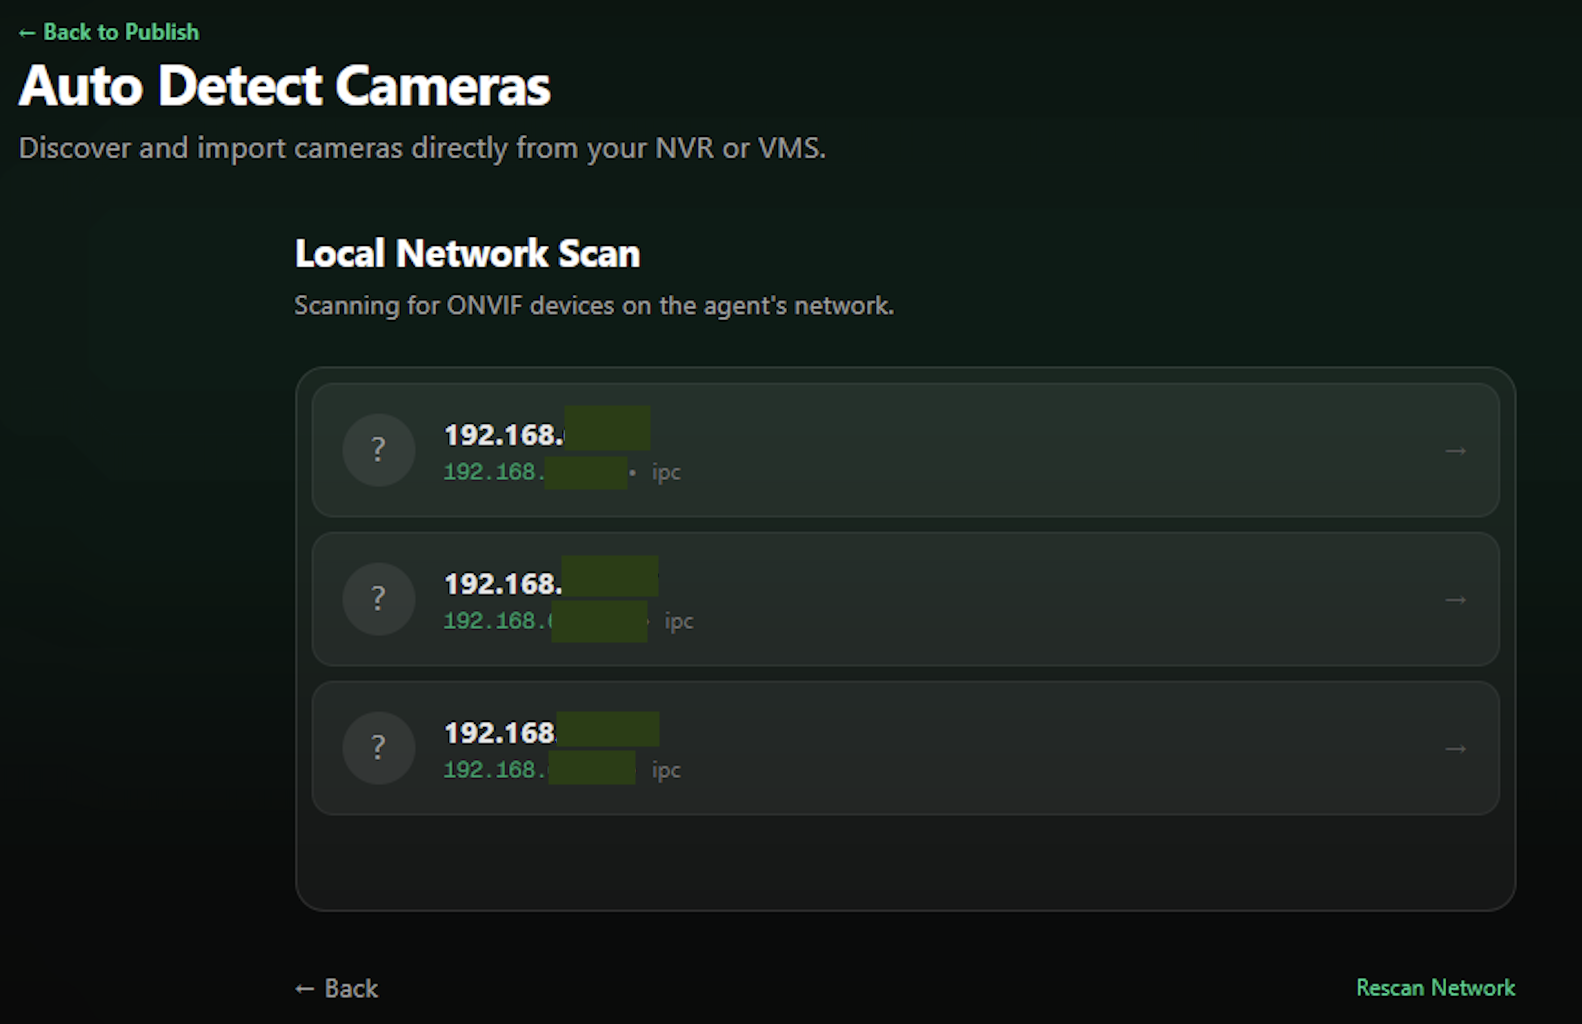
ONVIF Camera Discovery
TheRelay can automatically discover cameras on your local network using the ONVIF standard, eliminating the need to manually find and enter each camera's RTSP URL.
How It Works
Install TheRelay agent on any computer within the same network as your cameras. In the TheRelay console, select ONVIF Network scan and the system automatically discovers all compatible cameras, displaying them with their local IP addresses. Select a camera, enter its credentials, then choose whether to use the main stream (full quality) or sub stream (lower bandwidth). Import your selected cameras with one click.
Step 1: Press Auto Detect
On the Publish Page, press Auto Detect.
Step 2: Select the Agent
Choose the Agent/Computer to run the discovery from.

Step 3: Select Detection Type
Select Detection type: ONVIF.
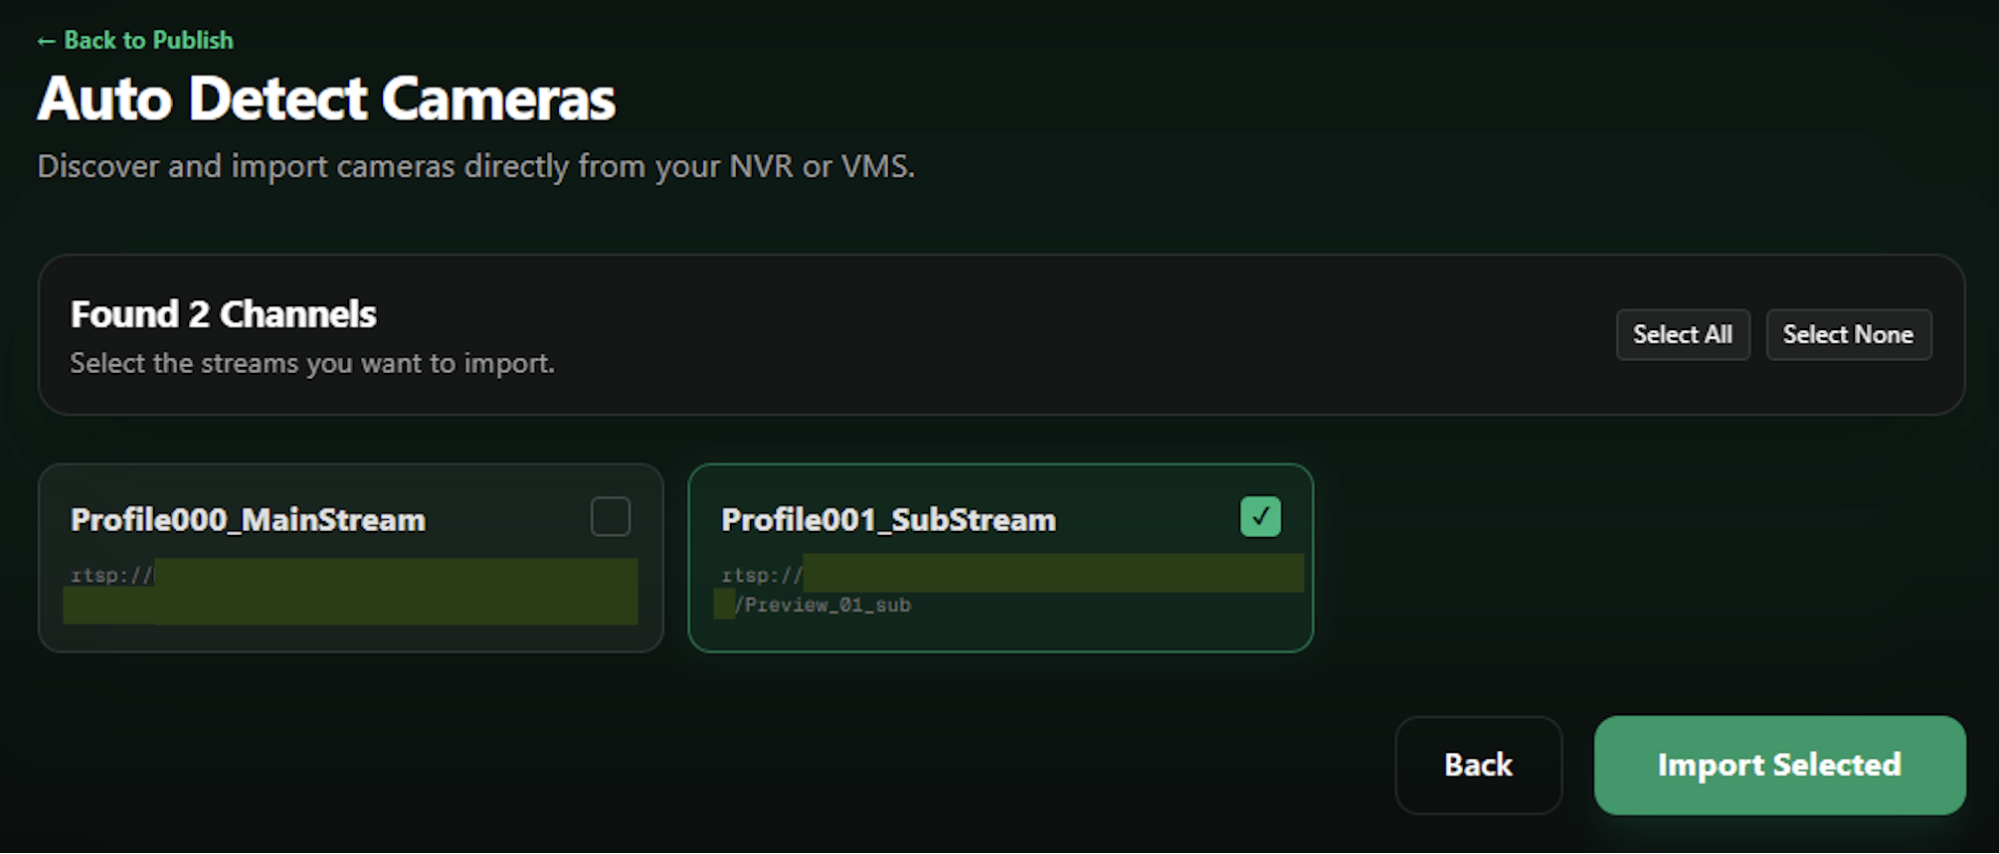
Step 4: Discovered Cameras
View the list of discovered cameras on your network.
Step 5: Stream Selection
Choose between MainStream (full quality) or SubStream (lower bandwidth).
HikCentral Integration
TheRelay integrates directly with HikCentral, allowing you to import cameras from your existing video management system without manually entering each camera's RTSP URL.
How It Works
Install TheRelay agent on any computer within the same network as your HikCentral server. In the TheRelay console, enter your HikCentral server address and the API credentials (App Key and App Secret) generated from HikCentral's OpenAPI Gateway settings. Once connected, TheRelay automatically discovers all cameras registered in HikCentral.
Benefits
- No need to manually find and enter RTSP URLs.
- Add dozens of cameras in seconds.
- Cameras stay organized using names and groups from HikCentral.
Step 1: Press Auto Detect
On the Publish Page, press Auto Detect.

Step 2: Select the Agent
Choose the Agent/Computer connected to your HikCentral network.

Step 3: Select Detection Type
Select Detection type: HikCentral VMS.

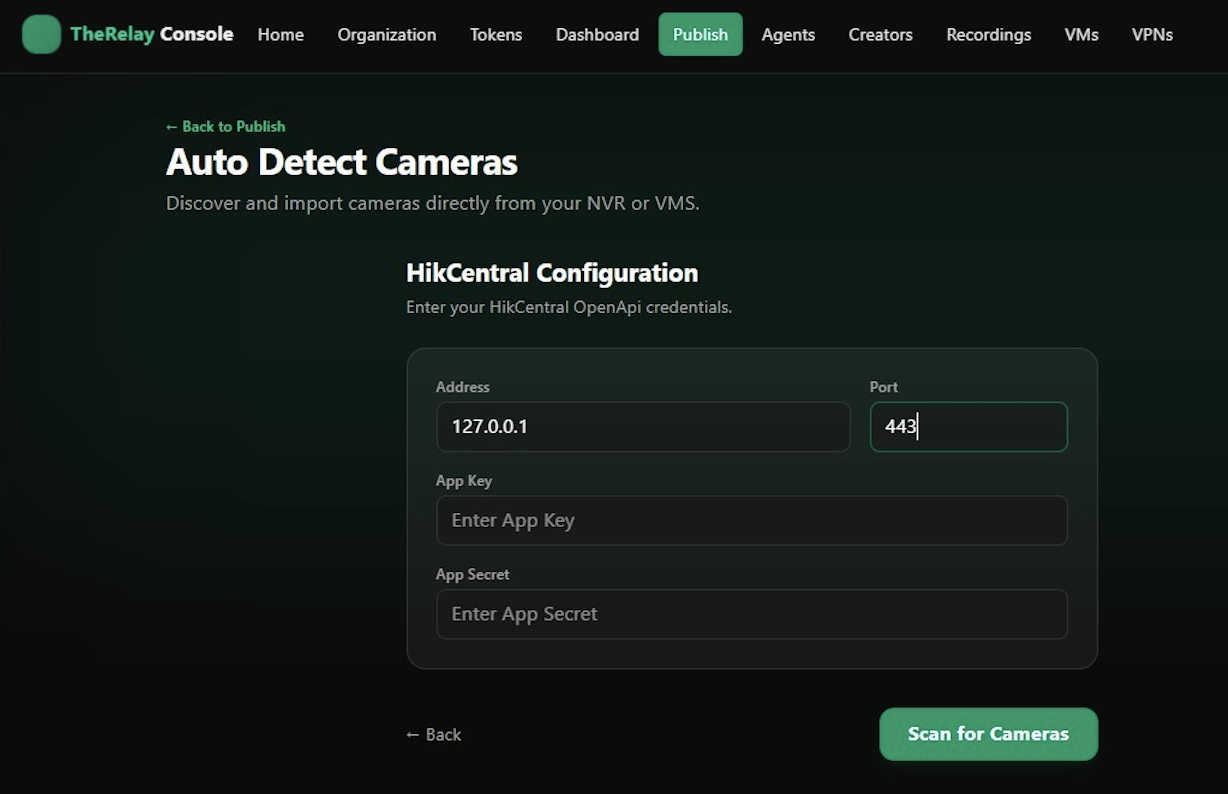
Step 4: Configure HikCentral
Enter your HikCentral server address and API credentials (App Key and App Secret).
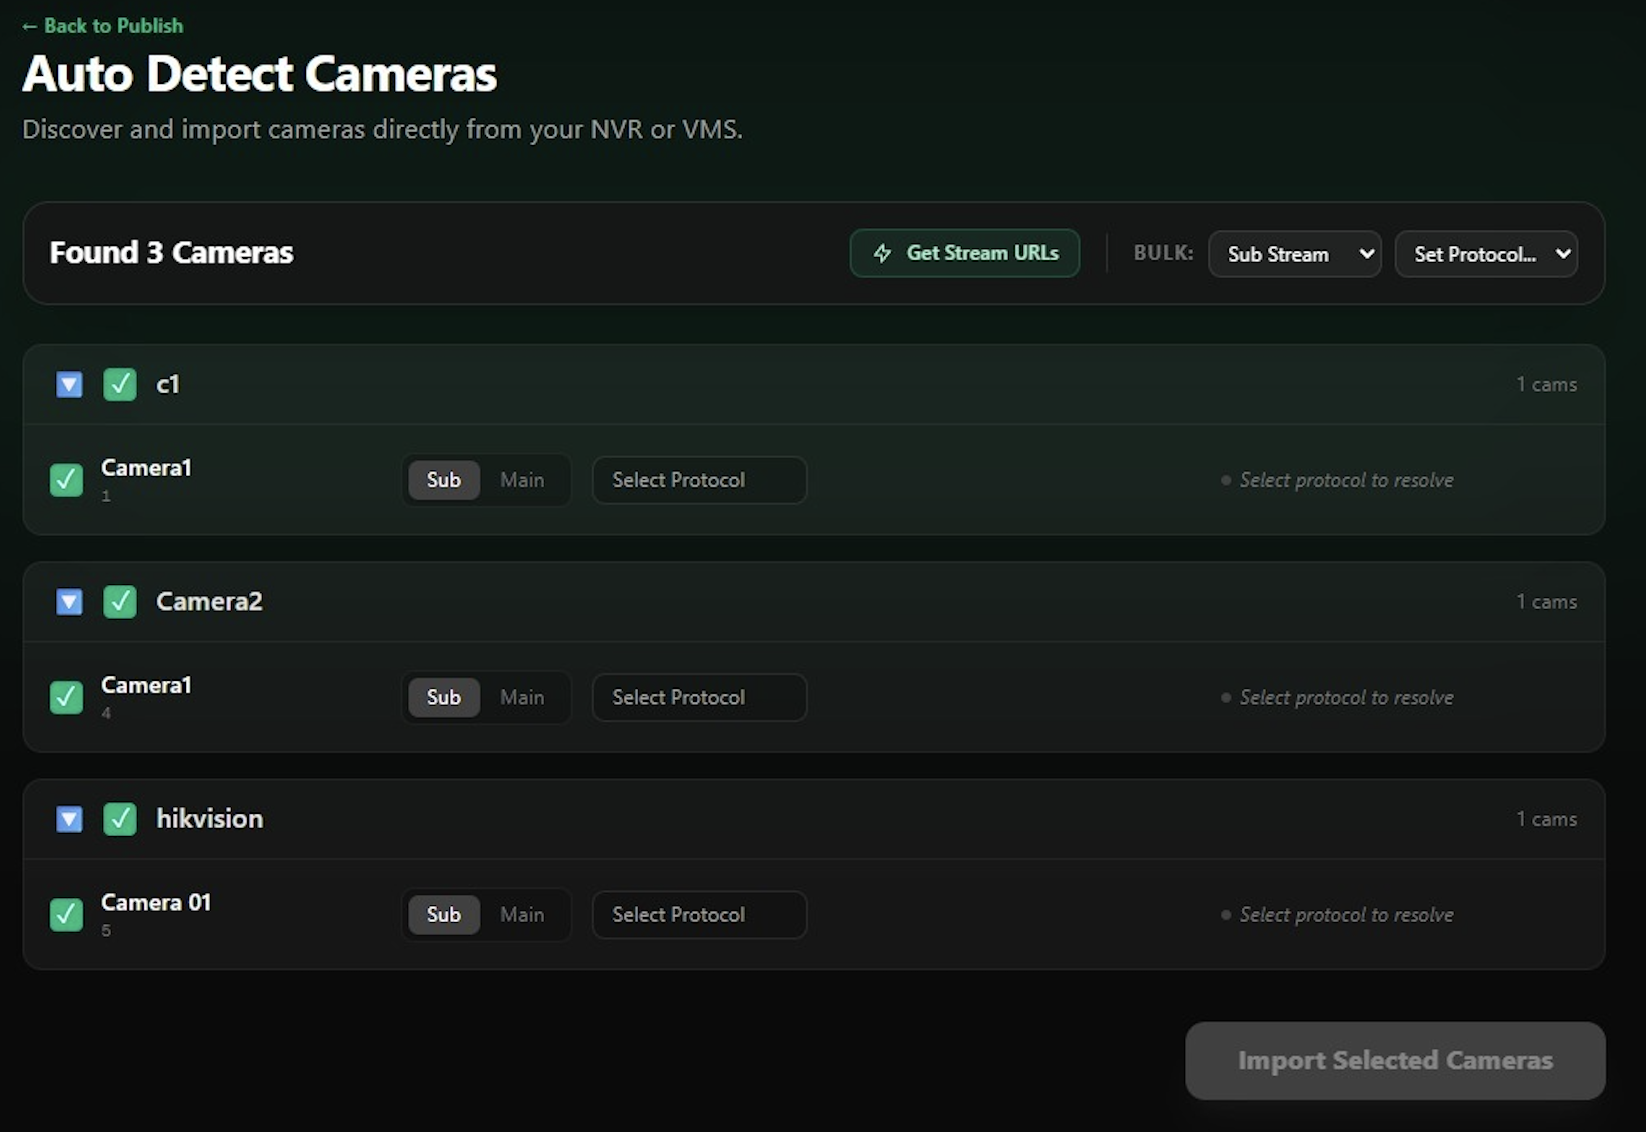
Step 5: Select Cameras
Select your cameras from HikCentral and import them.
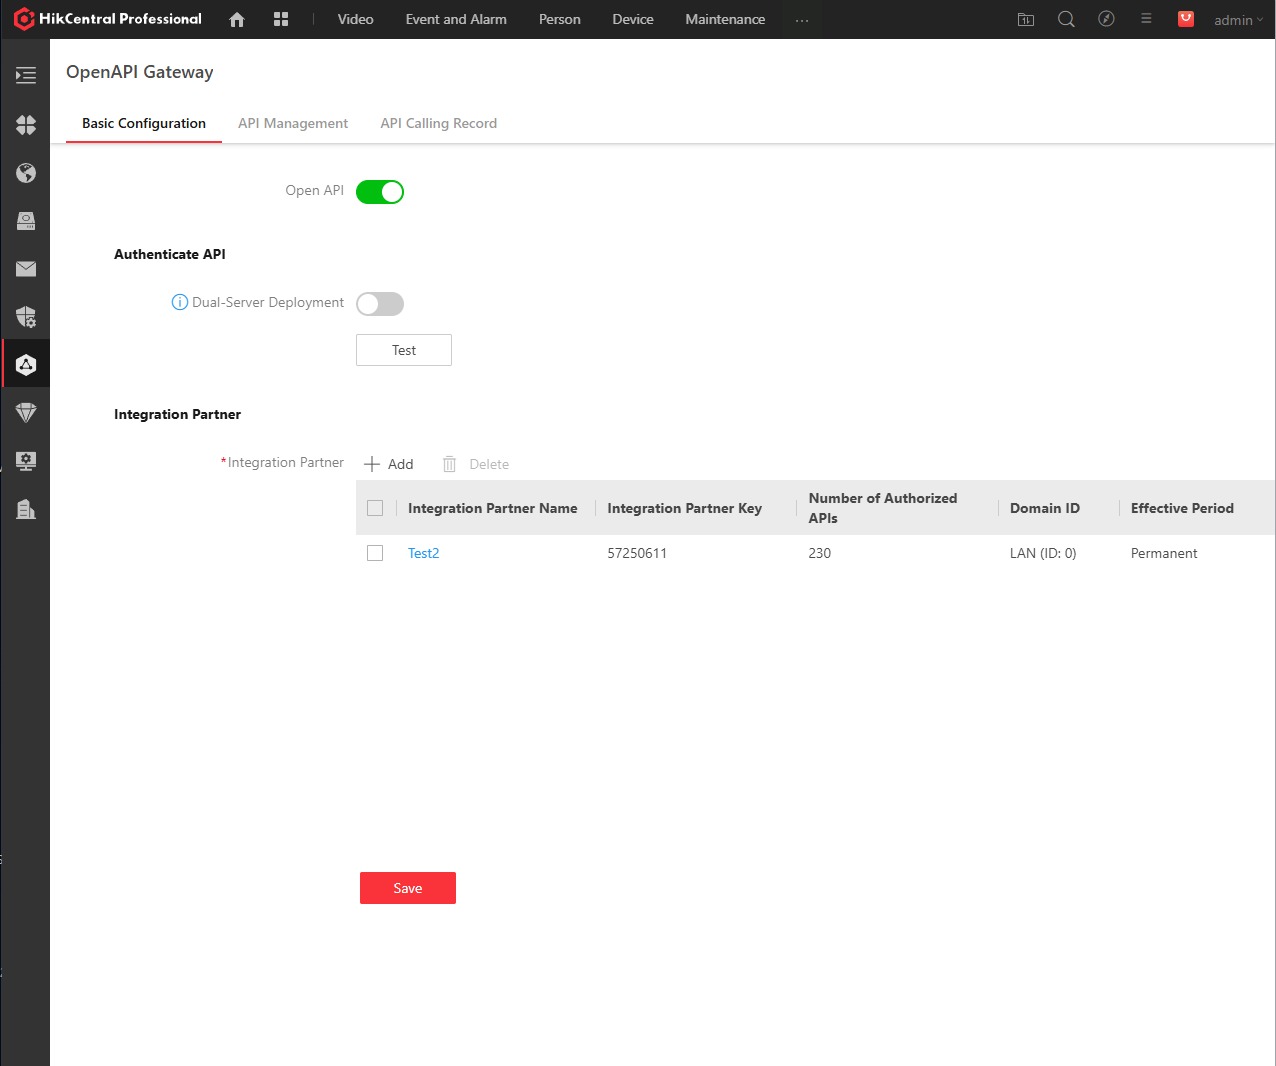
HikCentral Setup Requirements
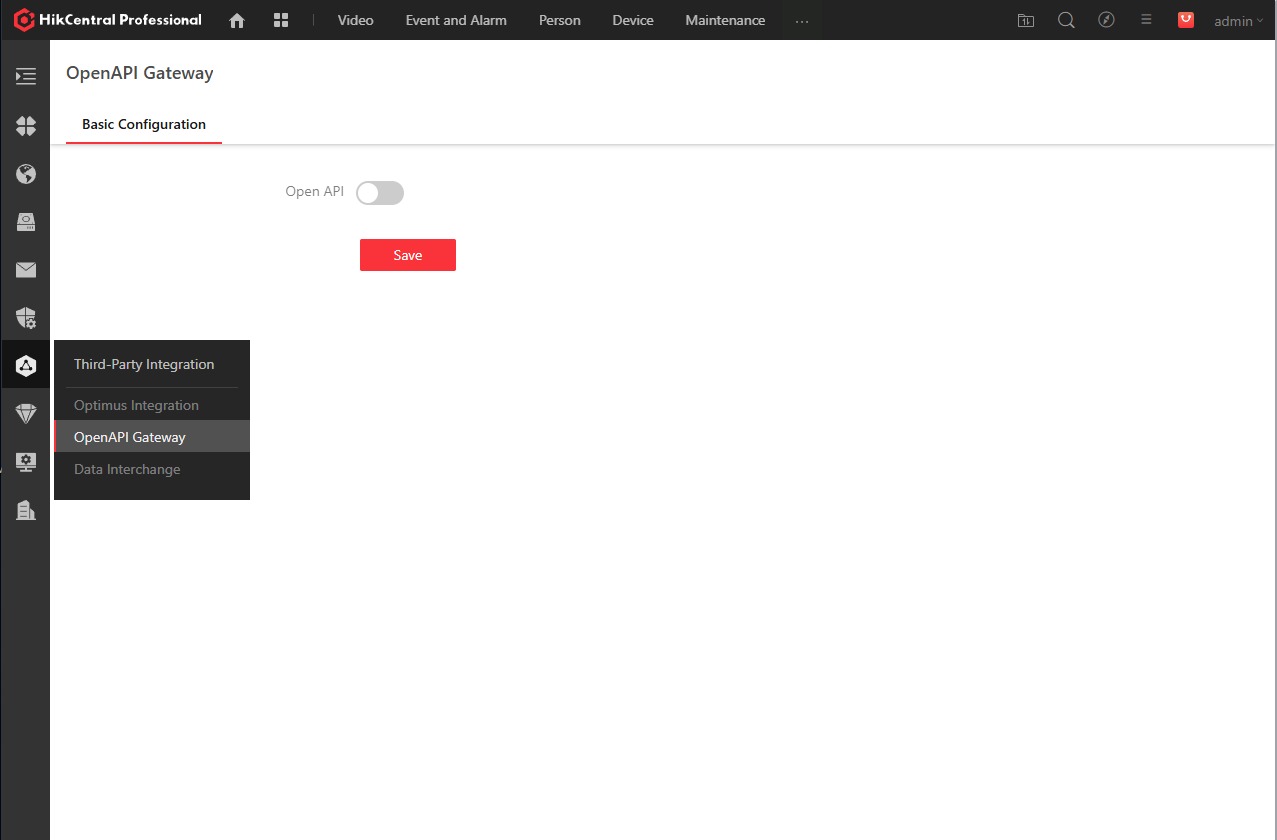
- Install Hikvision Open API plugin.
- Activate Open API from HikCentral Platform.
- Generate API Keys (App Key and App Secret).
- Configure API settings.
Secure Transport with WireGuard & SRT
TheRelay creates a private, encrypted network using WireGuard between your cameras and your destination—as if they were on the same local network, even when they're across the internet.
Two Layers of Security
- SRT Encryption: Encrypts the video itself using AES encryption.
- WireGuard Tunnel: Creates a private tunnel that isolates all traffic from the public internet.
Key Benefits
- Cameras remain invisible to the internet.
- No ports need to be opened—agents connect outbound.
- Connections remain stable regardless of IP changes.
- Network performance stays unaffected.
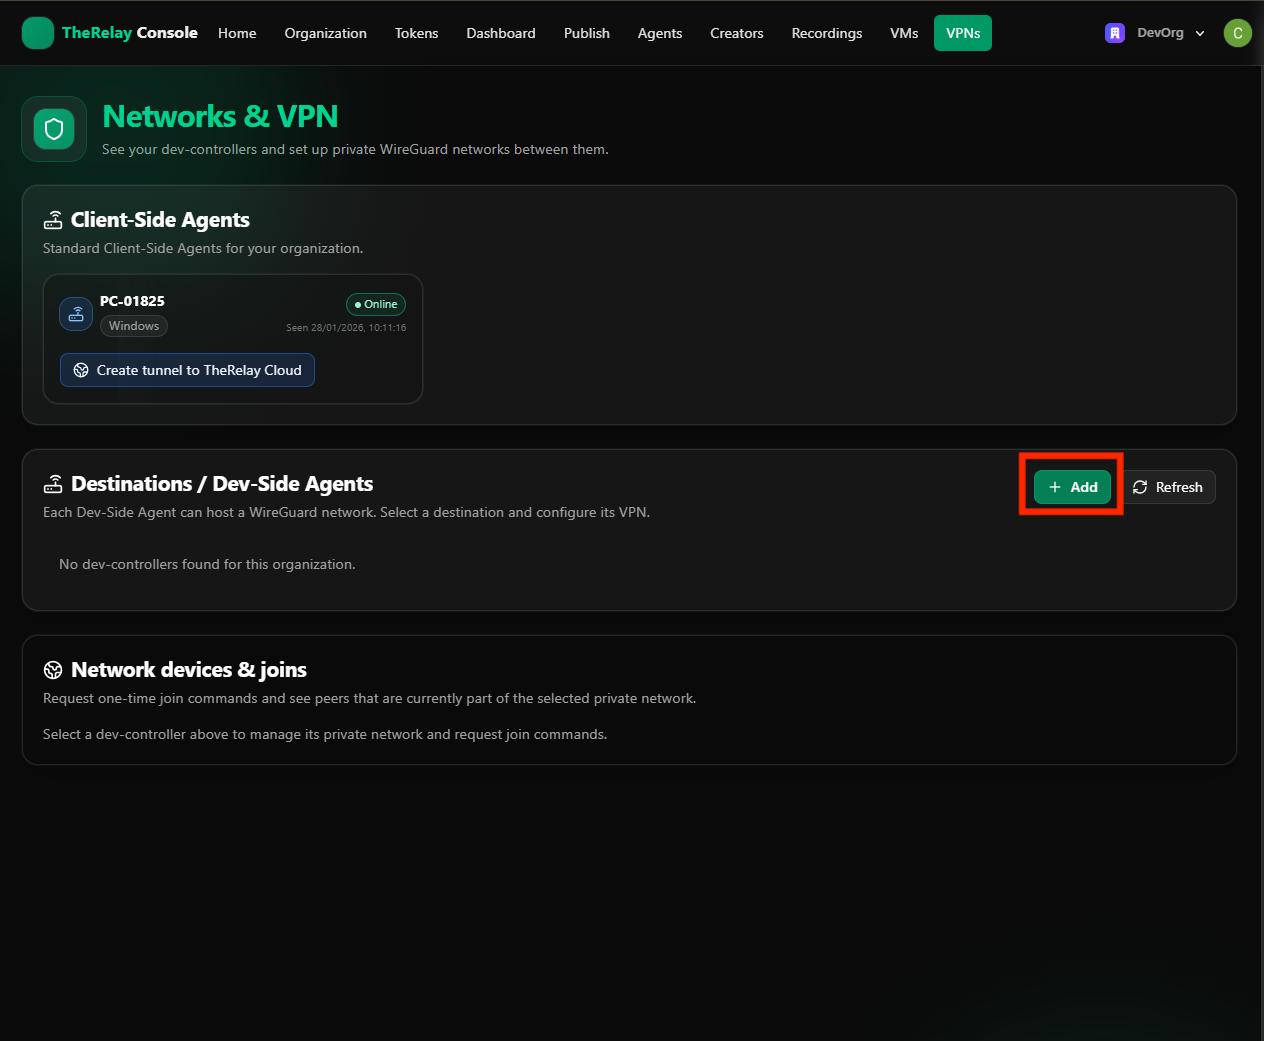
Step 1: Create Dev-Side Agent
Create a Dev-Side Agent that will host the WireGuard network.
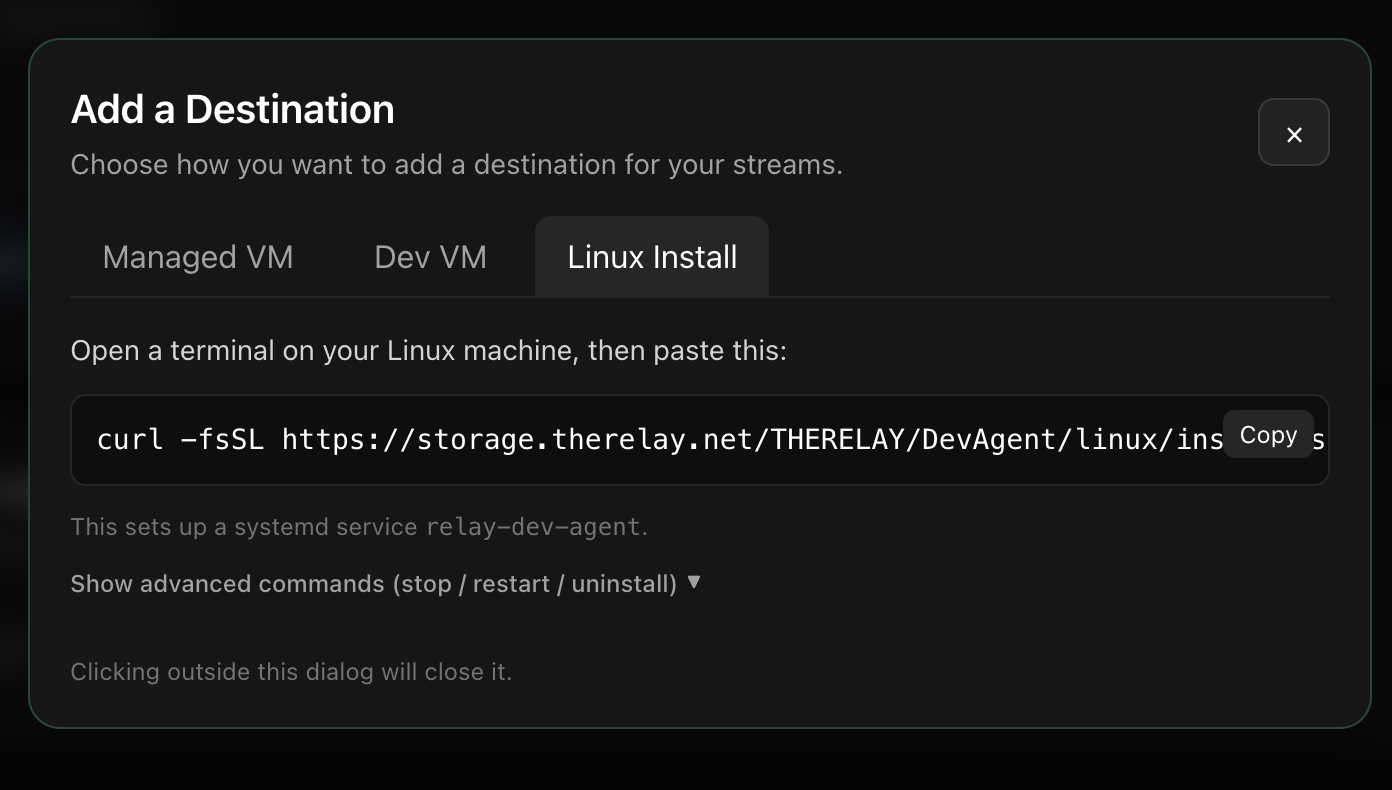
Step 2: Install on Linux Server
Install TheRelay agent on your Linux server.
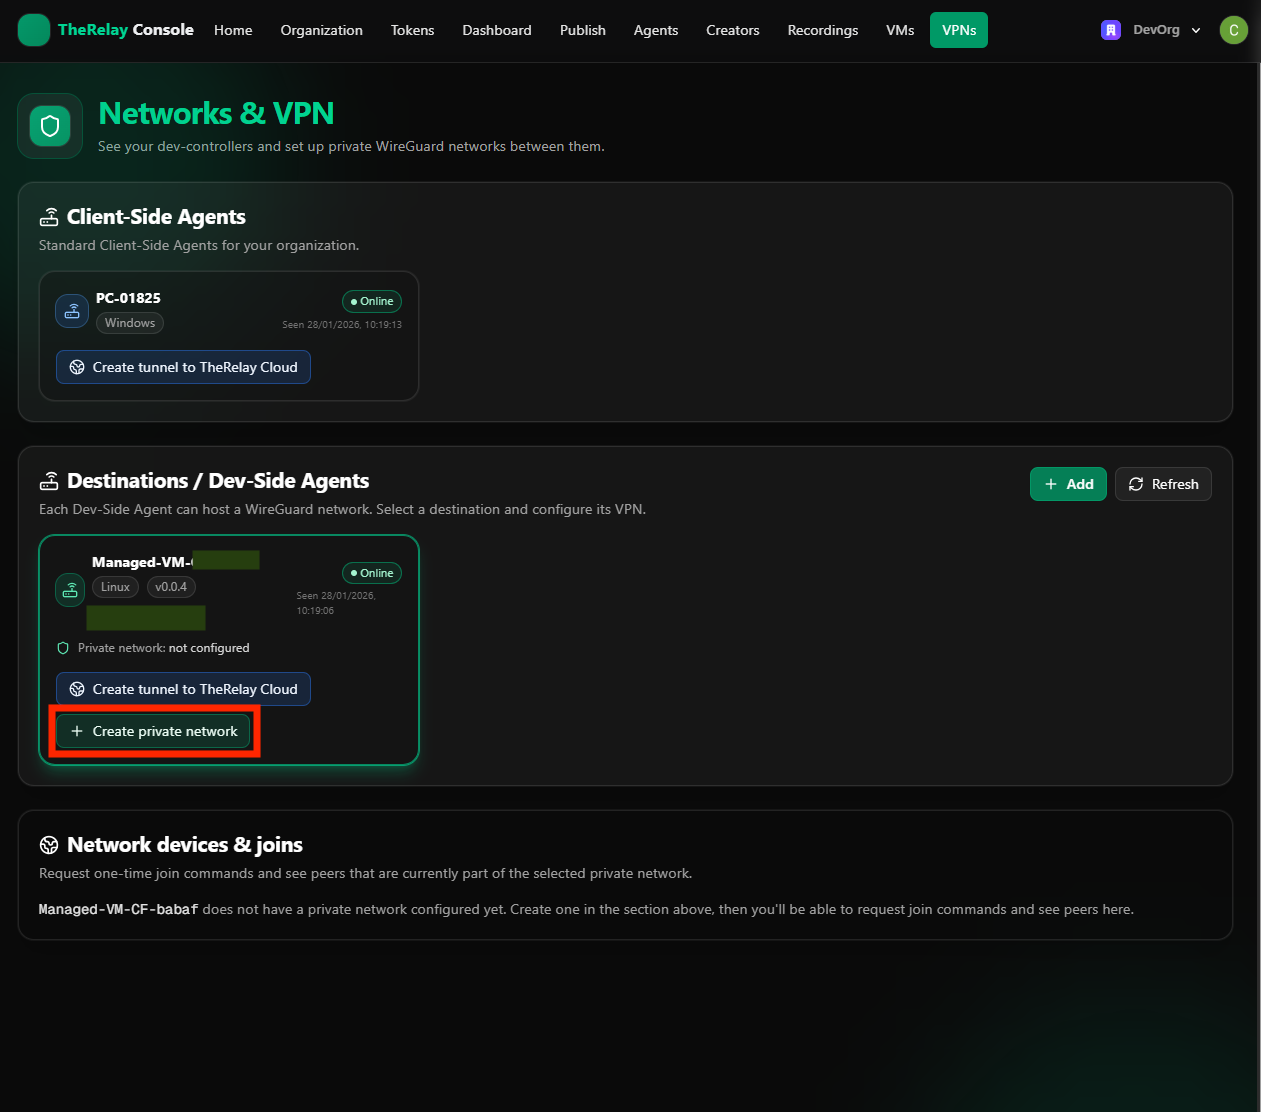
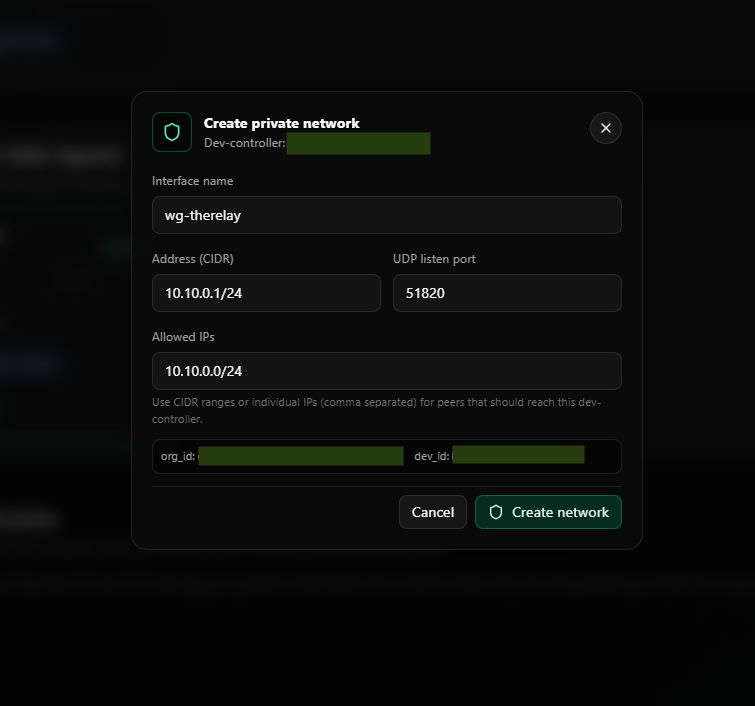
Step 3: Create Private Network
Select "+ Create private network" on the Dev Agent.
Step 4: Configure WireGuard
Configure the WireGuard connection settings and click "Create network".
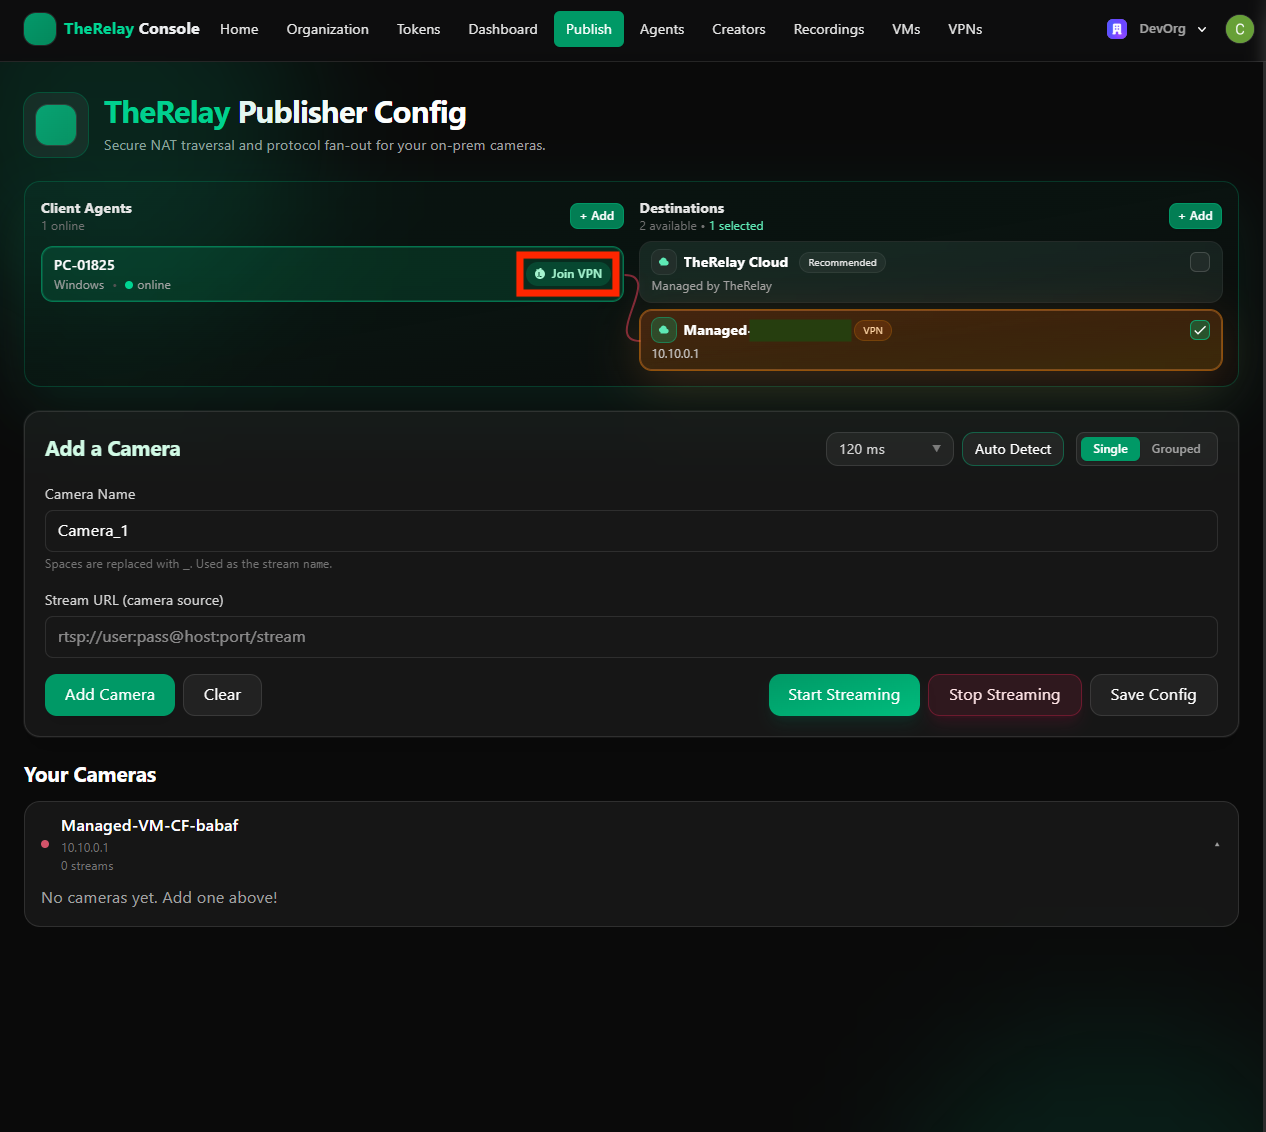
Step 5: Join VPN
Press "Join VPN" so the Client Agent will join the same WireGuard network as the Dev Agent.
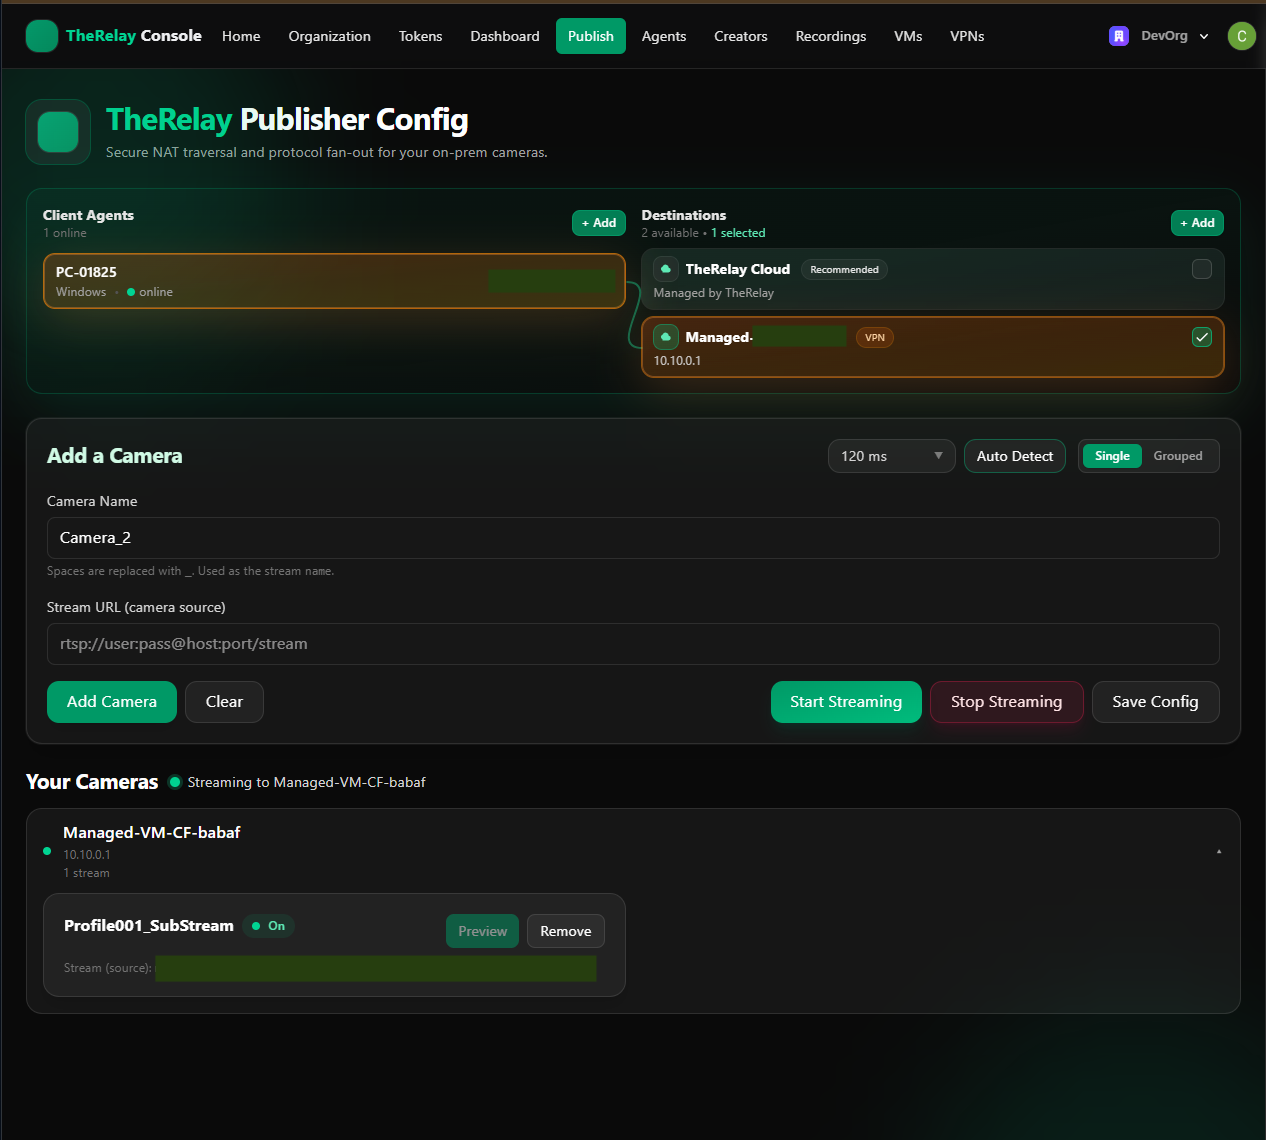
Step 6: Connected via WireGuard
TheRelay agents are now connected via WireGuard, creating a secure private network.
Tokens & Access
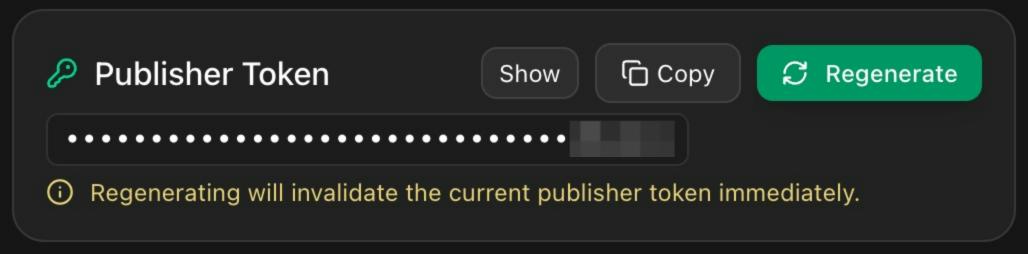
Publisher Tokens
Authenticate a TheRelay Agent to publish (send) a stream into TheRelay Cloud.
- Designed for continuous operation (may be non-expiring).
- Can be regenerated at any time.
- Intended only for publishing, not for viewing or managing streams.
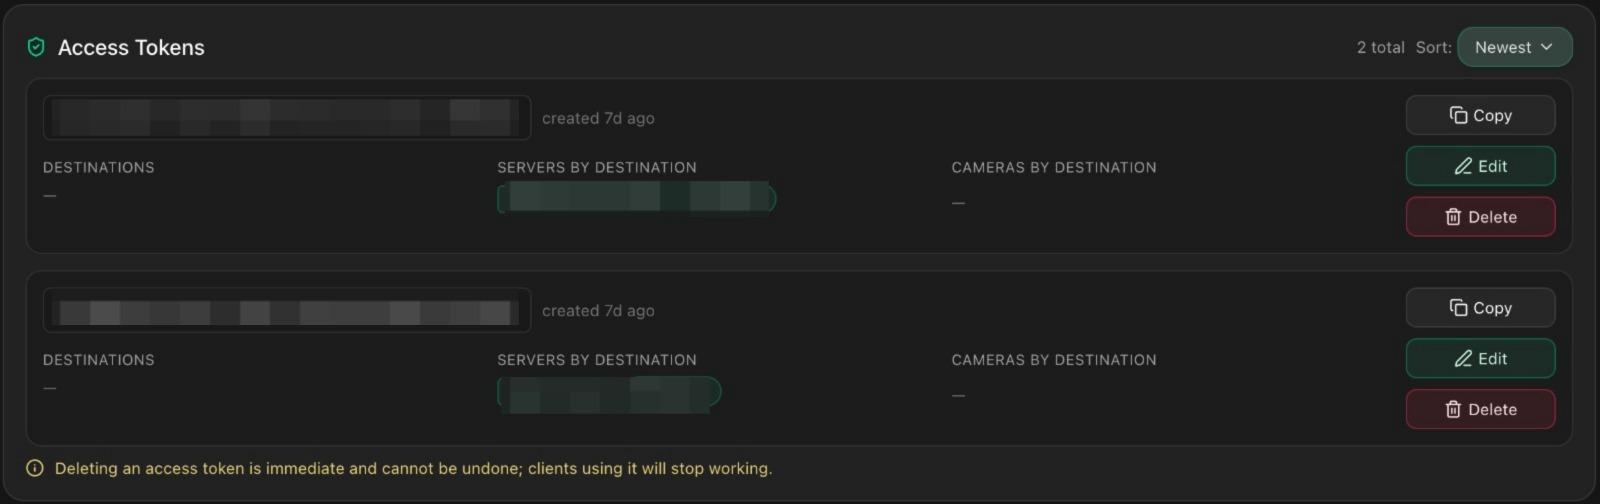
Access Tokens
Control view and management permissions for streams and resources.
- Required to open the dashboard and to authorize viewers or operators.
- Can be scoped to:
- Entire computer (host) - grants access to all cameras on that host.
- Individual cameras - grant access camera-by-camera for fine-grained control.
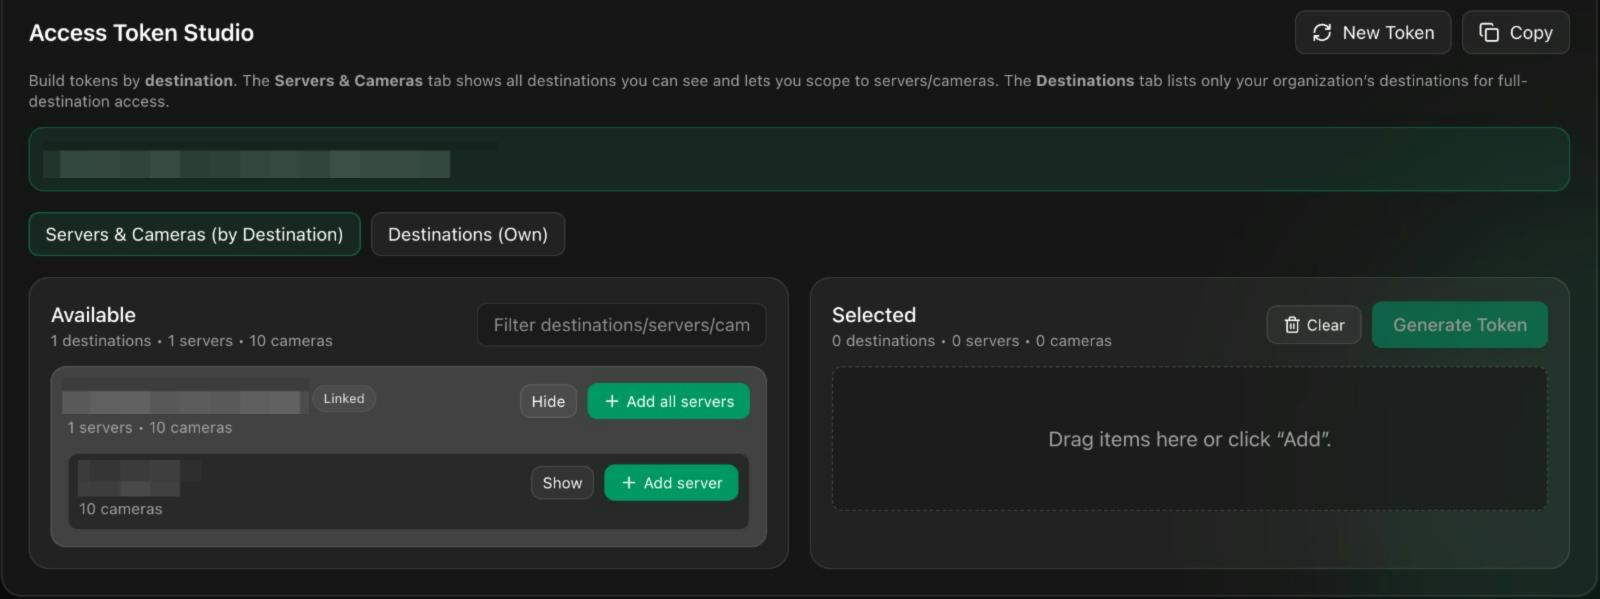
Access Token Studio
A guided tool in the dashboard for creating and managing Access Tokens. The Servers & Cameras tab shows all destinations you can see and lets you scope to servers/cameras. The Destinations tab lists only your organization's destinations for full-destination access.
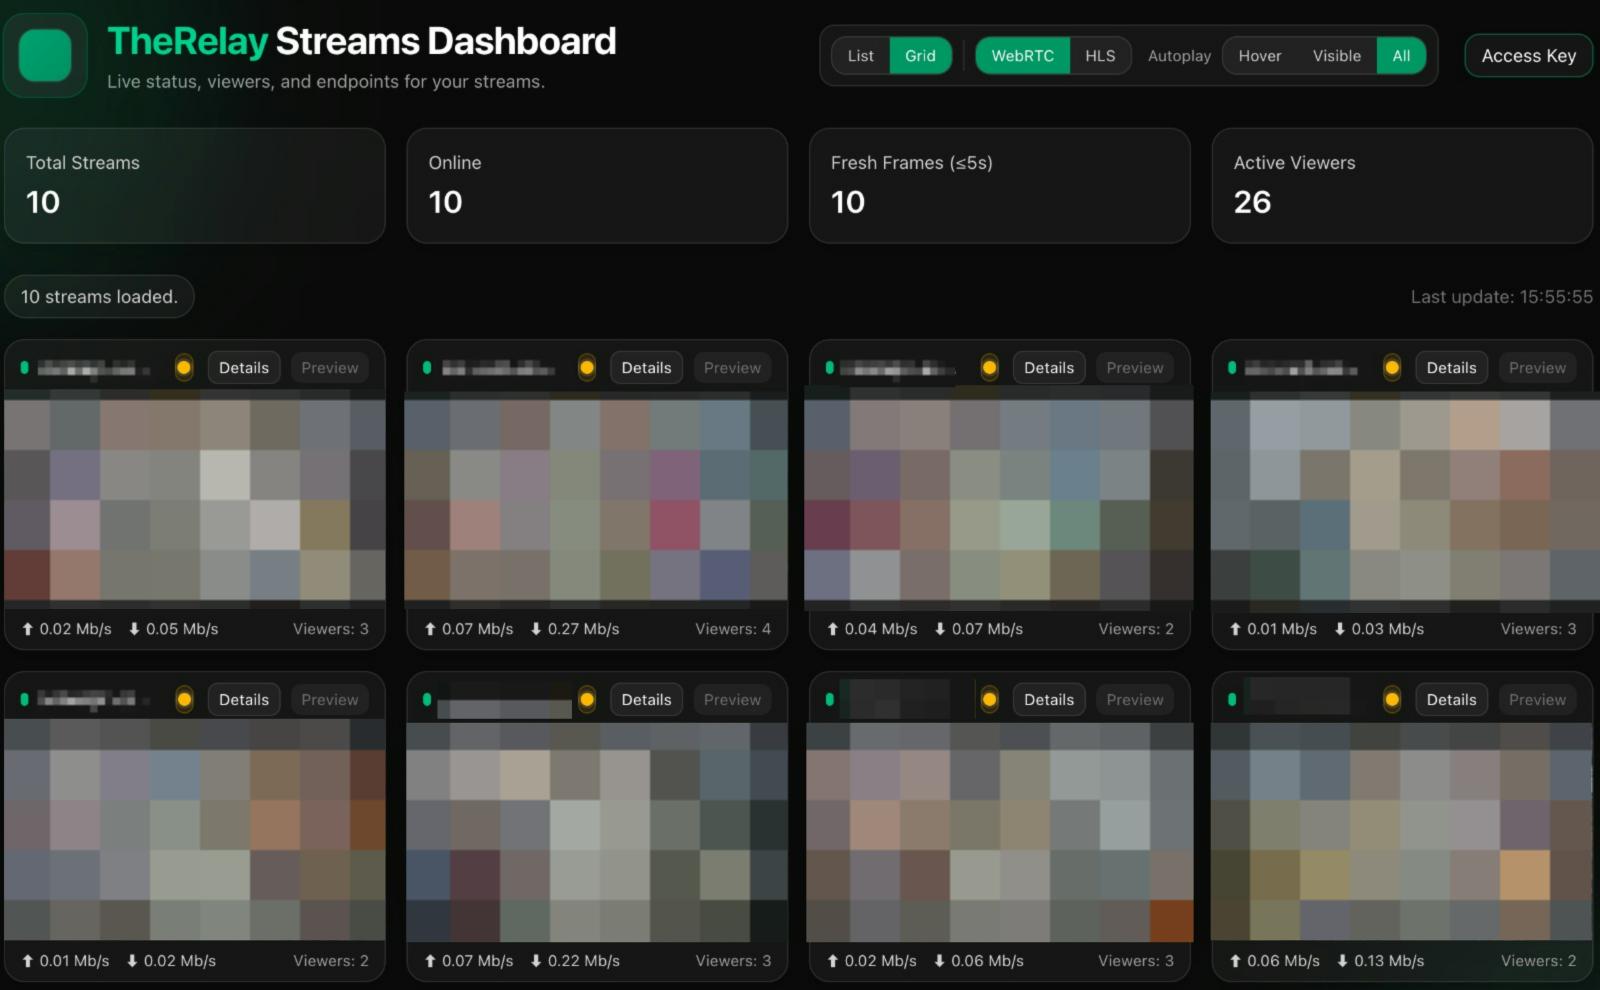
Dashboard
To have access to dashboard users need to have one Access Token with attached cameras. Once authenticated, the Dashboard loads all cameras associated with that token.
Cameras View
- For each camera (and in aggregate where applicable), the Dashboard displays:
- Total Streams - The number of active streams available under your token's scope.
- Active Viewers - Current consumers of the streams, which may include humans or automated systems (e.g., AI services).
- Live Ingress / Egress (per stream)
- Ingress: Real-time inbound bitrate/traffic into TheRelay Cloud from the publisher/agent.
- Egress: Real-time outbound bitrate/traffic from TheRelay Cloud to viewers and downstream services.
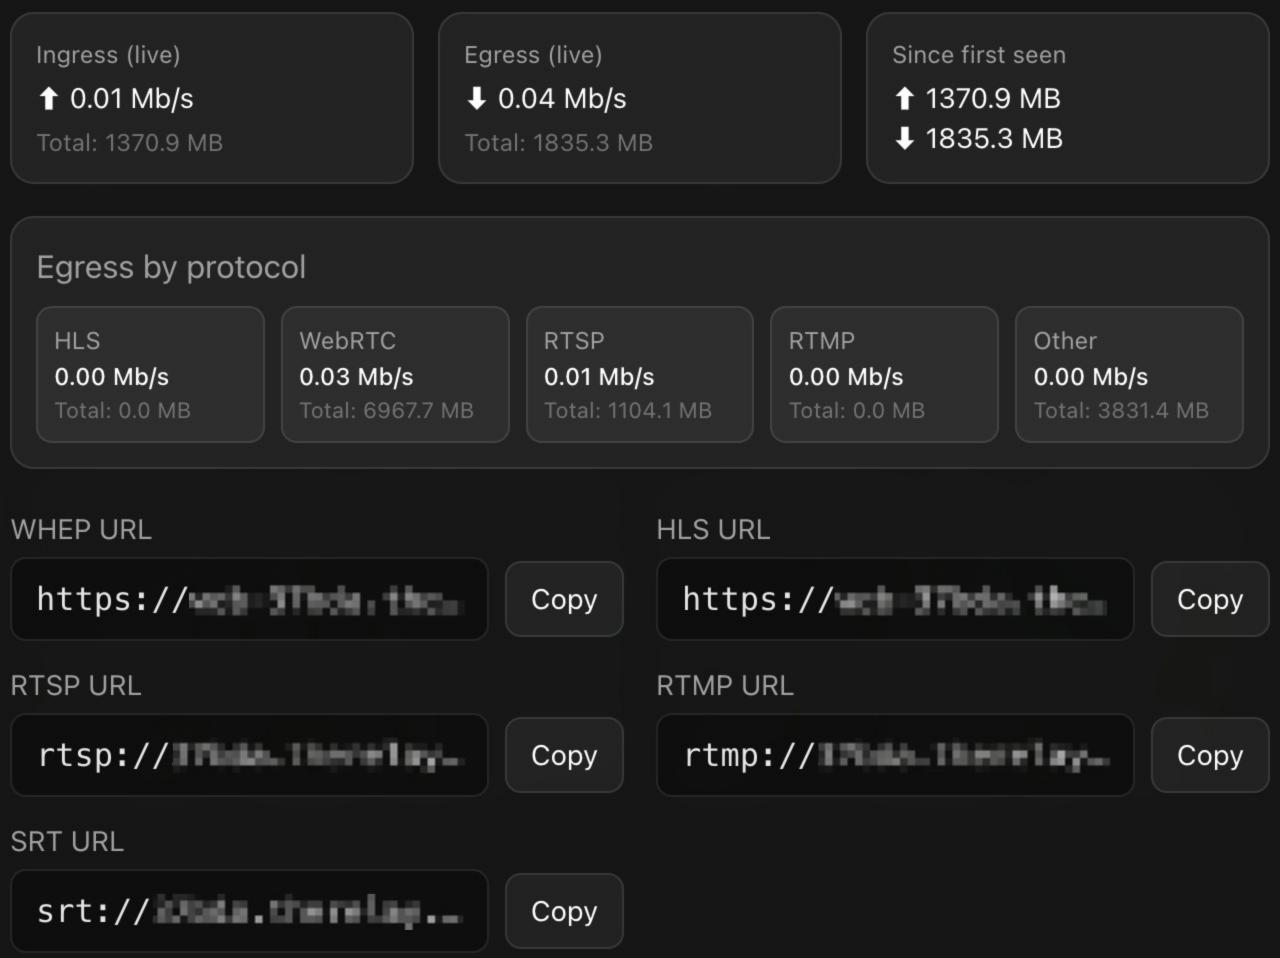
Stream Details & Protocol Endpoints
Selecting a stream opens its details panel, where you can access standard streaming endpoints:
- WebRTC
- RTSP
- SRT
- HLS
- RTMP
Use the provided controls to copy the URLs and integrate them into your application, player, or AI pipeline.
Security Architecture
LAN → Cloud
- Encrypted SRT from TheRelay Agent to TheRelay Cloud.
- Outbound-only connection from your LAN — no inbound ports opened on your router/firewall.
- Camera credentials stay on the LAN, stored locally by TheRelay Agent; they are never sent to the cloud.
Streams Access
- Access is granted via Access Tokens with camera-level or agent-level scope.
- You can revoke tokens at any time.
Why TheRelay is more secure than opening ports for RTSP
No exposed services on the public internet
- With TheRelay: Your cameras and agent are not reachable from outside; the agent dials out securely.
- With open RTSP ports: You publish a public endpoint that can be scanned, brute-forced, indexed, or misconfigured.
Encrypted ingest by default
- TheRelay: Uses SRT with AES encryption from LAN to cloud.
- Open RTSP: Classic RTSP is unencrypted — even with digest auth, the media itself is sent in the clear via RTP.
Least-privilege, scoped sharing
- TheRelay: Share exactly what’s needed: one camera (camera token) or all cameras on a host (agent token).
- Open ports: Anyone with the URL or credentials can hit the entire exposed service, often with broad access.
No credential leakage
- TheRelay: Camera usernames/passwords never leave the LAN; viewers only receive tokens, not camera credentials.
- Open RTSP: Viewers typically need RTSP credentials, which can be shared, reused, or phished.
Simple revocation
- TheRelay: Kill access instantly by revoking a token — no firewall surgery or camera reconfiguration.
- Open RTSP: Requires changing camera passwords, updating firewall rules, and redistributing new credentials.
Reduced operational risk
- TheRelay: Outbound-only pattern avoids fragile port-forward rules and reduces attack surface.
- Open RTSP: Port forwarding is error-prone; a single misrule can expose more than intended.